Animating a Walk Cycle for a Biped Character in Art of Illusion

by Julian MacDonald (feel free to email comments and suggestions)

Written: 8 June 2002 for Version 1.1

Getting a character to walk is a keystone of character animation and is something that is not as simple as it sounds. In this tutorial, I will be attempting to show how a walk cycle can be created in Art of Illusion. The method demonstrated here is by no means the only way to do it but it works.

The Model

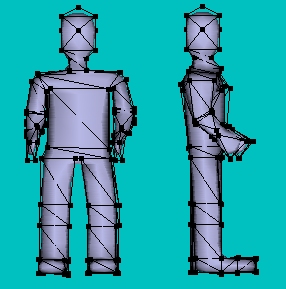
For this tutorial, I am using a fairly simple humanoid figure (walk_model.aoi) created by starting with a cube (for the head), converting to a triangle mesh with approximating smoothing and performing lots of extrusions to form the body, arms, legs etc.


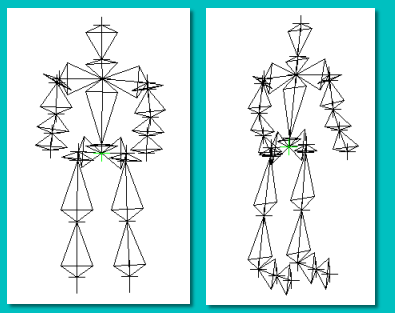
The skeleton for the model is very important. It needs to be flexible enough to allow the model to be easily posed. The skeleton I have set up for this model is shown on the right. For the walk cycle, there needs to be the ability to rotate around the hips, knees, ankles and toes and the shoulders and elbows.

The perspective view on the right shows the set up for the feet; there are 2 bones in each foot to allow the 'toes' to bend separately from the rest of the foot - this is very important as we shall see later.

For this example, I have also set up the bone rotations to allow rotations only in the forward plane of the limbs; i.e. legs cannot rotate outwards. This is not true to life of course but, for this simple example, it will allow posing the character to be far easier. Bone rotations are controlled through the Skeleton -> Edit Bone menu command in the mesh editor - see the manual or the mesh tutorial for details.


Basic Walk Motions

Before we start to create the various poses we're going to need, we must first consider the basic body movements during a walk. For a simple walk along a straight line, there are two motions to consider: forward motion and up/down motion. Forward motion is simple as it's just movement at a constant speed so that distance = speed x time. Up and down motion is a kind of bobbing motion; try walking forward keeping you eyes straight ahead and you will see your view bob up and down. There is no neat mathematical equation to describe this motion; it will vary on the posture and type of steps taken.

The first thing we're going to do in setting up this walk cycle is to define these 2 movements. For this, I have chosen to use 2 rigid position tracks; one for each movement direction. You could actually combine these into one track but it is easier to separate them. The tracks are going to be 'Relative' mode tracks; i.e. the movements defined by them add onto the current model position. This makes it easier to pick up the model and put it anywhere we like and get it to do a walk there. Incidentally, you will need to creat a 'floor' for the character to walk on; a flattened cube will be fine.

Right then, click on Animation -> Show Score to get the score up. Select the character mesh from the Object List; if you look at the track list under the object on the score you will probably see 2 tracks assigned to this mesh by default: a rotation and a position track - delete the rotation track, we don't need it in this tutorial. We will use the default position track to set the initial position of the character. Place the model so that its feet are on and at one end of the 'floor' and click on Animation -> Keyframe Modified Tracks of Selected Objects to keyframe this position.

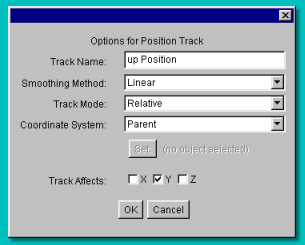
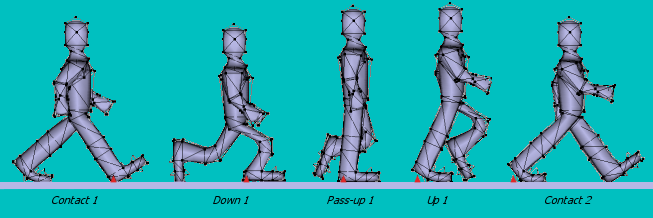
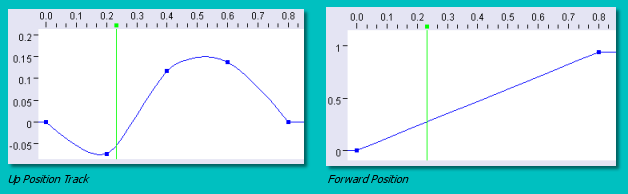
Now for the walk motions. Create 2 new position tracks by selecting Animation -> Add Track to Selected Objects -> Position twice. The new tracks will be placed on top of the initial position track which means they will be applied after that one, which is what we want. Double-click on one of the new tracks to display the options dialogue, set the Track Name to 'Up Position' or something similar, Smoothing Method to Linear, and the Track Mode to Relative.

Also set Track Affects to Y only since this track is only going to control motion in the y-axis.

Repeat this with the other track except name it 'Forward Position' and set the Track Affects to the relevant axis. In this tutorial, my character is walking in the x-direction.

Now to keyframe the wholebody movements. Let's start with the forward motion (x-direction in my example). As stated above, the x displacement is equal to the speed multiplied by the time. The speed of the character is going to depend on the type of walk (casual stroll, march, run etc.) and on the length of the legs. I suggest a speed of around 1.5 x leg length units/second for a fairly relaxed walk. My model has a leg length of about 0.8 units and therefore its speed is 1.2 units/second. Also note that for this tutorial, my character will take one step every 0.8 seconds. According to Richard Williams' excellent book The Animator's Survival Kit (which I thoroughly recommend), this is between a brisk walk and a stroll. So, at the end of the first step, the model will have travelled a distance of 1.2 x 0.8 = 0.96. So, move the time marker to 0.8, select the Forward Position track from the score and and select Animation -> Keyframe Selected Tracks . This will add a keyframe for that track at 0.8 seconds. Double-click the keyframe to bring up the dialogue box below:

Enter 0.96 for the X entry. The Y and Z entries do not matter as we have set this track to affect the x direction only.

Don't worry too much about the smoothness settings at the bottom. We have set a linear smoothing method and so these values have no effect. You may want to play around with using interpolating or approximating smoothing methods together with these smoothness values after this tutorial.

Right, the model will now slide along the floor if you preview the animation. Now to get it to bob up and down. Now, one step of a walk cycle looks a bit like the set of poses shown in the figure below; in fact these are the set of poses we will be creating in the next section. The positions shown are going to be set at 0, 0.2, 0.4, 0.6 and 0.8 seconds. The reason I am showing them now is so that you can appreciate the up and down movements of the whole body.


The magnitude of the bob will depend on the type of walk but this set of poses lets us see the relative variation in height that we need to achieve. Select the Up Position track from the score list. Move the time marker to 0 and add a keyframe to the track using Animation -> Keyframe Selected Tracks. Double-click on the keyframe and change to Y value to 0. To define the rest of the positions, it is easier if you switch to the graphed keyframe view by clicking on . Now, move the time marker to 0.2 and add a keyframe as before. Double-click and change the Y value to around -0.05. We will play around with the exact values later. Repeat this process at 0.4, 0.6 and 0.8 seconds adding Y-values to reflect the changes in height shown by the poses above. You should end up with a graph that looks like that below:
The Forward Position track should look like that below right:


OK, one last thing to do before we move on to the poses. We have to make sure that the feet just touch the floor for the highest body/head position, i.e. at 0.6 secs. So, move to that time, adjust the height of the model so that the feet rest on the floor, select the initial position track and select Animation -> Keyframe Selected Tracks. However, we want to apply this initial position at the start of the animation, so delete the original keyframe we made for this track at time 0 and drag this new keyframe over to time 0 instead. If you run the animation through now, the model should start off with its feet in the ground, sink even lower, rise up so that its feet are in the correct position at 0.6 secs and then sink back into the ground again.

Poses

Having established the basic motion of the body, we can now work on producing the various walk poses. Add a pose track to the character by selecting Animation -> Add Track to Selected Objects ->Pose. You will get the usual warning about not being able to add/delete points - just click OK. The first pose, called the contact position, is shown in the poses image above and has both legs virtually straight. We'll make the right foot the pivot for the first step. Move the time marker to 0 and double-click the character object in the Object List to display the pose editor. See the manual for more details about the various parts of this dialogue. Click on the Default Pose in the list on the left (at this stage, the only thing in the list) and click on Duplicate to get a copy of it. Give this copy a name (contact1) and double-click it (or select it and click on Edit) to display the mesh editor. What you need to do is move the legs and arms to the positions shown in the left hand pose in the poses image above using the skeleton. I find that it is best to re-define the base of the skeleton quite often and move the bone immediately after it in the hierarchy; this gives more control. This method is called Foward Kinematics. For example, set the base at one of the hips and then rotate the knee joint into position. Then re-set the base at the knee joint and move the ankle etc. Alternatively, if have done the bone set-up very well to constrain the bones' rotations, you should be able to grab the foot and rely upon the Inverse Kinematic calculations partly. Note the toe bend in this pose for the left foot; this is very important. You will also want to make sure that the model touches the floor; select View -> Show Entire Scene to show the floor position in the mesh editor.

When happy, click OK to go back to the Pose dialogue window. You now have this pose in the gesture list on the left. Make sure it's selected and click on Add >> to add it to the Pose list, then click OK. Now to set this pose, go to Animation ->Keyframe Selected Tracks and this will add a keyframe for this track at time 0.

Now, one of the most important and difficult things when doing a walk cycle is to to avoid the feet slipping along the floor as the character moves. One way of helping to avoid this is to place another object as a marker. I use a simple triangle polygon. Create one using the polygon tool and drag it so that it is lined up with the heel of the right foot as shown on the right (I have artificically enhanced this so that it shows up more clearly). This is the pivoting foot and so it's forward position shouldn't change.


Now for the next pose. Move to time 0.2 and double-click on the model in the Object List again. As before create a duplicate of the Default Pose called down1 and bring up the mesh editor. The pose you are aiming for here is shown in the poses image above. Use the polygon to make sure the right foot doesn't slip forward or backward by adjusting the skeleton so that the heel is lined up with the polygon. The poses image shows this polygon (artificially enhanced in red so as to be visible for this tutorial). If you have set the forward speed about right, you should have no problem in getting the skeleton into an appropriate position to allow this. If you do have difficulty because the model has moved too far forward or not far enough, exit the pose dialogue, adjust the Forward Position Track to slow down or speed up the forward motion, and try again. Also note that the amplitude of the Up Position 'bob' could cause problems; again exit and adjust this if necessary. When done, click OK to return to the Pose dialogue. In the Pose list is the pose from before (contact1) which we don't want, so select it and click on << Remove . Then click on the new gesture (down1) in the Gesture list and click on Add >>.

Repeat this process for the poses shown up to time 0.8 which is the end of the first step and the beginning of the next. The next step of course has the left foot as the pivot point so move the polygon to line up with the heel of the left foot at time 0.8. We also need to extend the body movement tracks for the next step. The Forward Motion track is easy; drag the keyframe along to 1.6 secs, double-click it and change the X value to twice what is was before (in my case, 1.92). For the Up Position track, we need to copy the 'bob' pattern. To do this, select Animation -> Bulk Edit Keyframes -> Copy to display the following dialogue:

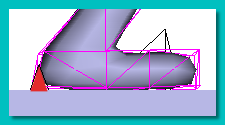
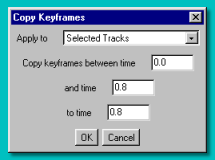
Enter the values shown on the left to copy the movement to the second step.


Now, we can move on and create the final poses. These are basically the same as the first step except that the legs and arms are reversed. After all the poses are defined, the Pose dialogue should look like that below with 8 poses (not including the Default Pose):


Tidying Up

In theory, that should be the walk cycle complete. In practice, however, it might not be. Although all the poses that we made sit nicely on the floor, it is likely that the in-between interpolated positions will have the feet dipping into the floor. Look at the example below. The first and third images show the front view at times that were set by poses. The middle image shows an interpolated frame at 0.1 seconds. As you can see, the feet sink significantly into the ground.


There are 2 ways to combat this problem. The first is to insert additional Up Position keyframes between the ones we have already set up and the second is to insert additional Pose keyframes.

For example, to solve the problem above, move the time marker to 0.1, select the Up Position track only and click on Animation -> Keyframe Selected Tracks. This will add a new keyframe at 0.1 seconds. You may find that your model disappears off the screen, but don't worry about that. Switch to the graph view and drag the new keyframe down to near 0; the model should reappear. Now adjust the keyframe carefully until the model's feet sit nicely on the floor. Now check the animation again and repeat this correction for any other points where the feet sink through the ground.

This is the revised Up Position track I ended up with to stop the feet sinking into the ground:


As previously mentioned, you could have created a new Pose instead at the in-between position.


Looping and Rescaling the Walk Cycle

Now we have completed one complete cycle of the walk; the character is back where it started in terms of pose. To get a long walk, all we need to do is loop the cycle. This is achieved by selecting the Up Position and Pose tracks and clicking on Animation -> Bulk Edit Keyframes-> Loop. This will display a dialogue similar to that below. Choose to loop Selected Frames from 0.0 to 1.6 and loop it, say, 5 times.


We will also need to adjust the Forward Position track but this cannot be looped. Simply drag the keyframe at 1.6 seconds over to 8 seconds (5 x 1.6), double-click it and change the X value to 5 times the current value (in my case, 9.6 units).

That's it. Orient and position the camera to the required view, run a preview of the animation and render it when happy to a set of movie files to produce something similar to that shown below:


If necessary, it is a fairly simple job to make the model walk faster or slower. Simply select the Forward Position, Up Position and Pose tracks and click on Animation -> Bulk Edit Keyframes -> Rescale to display the following dialogue:

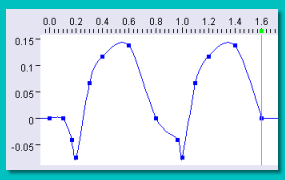
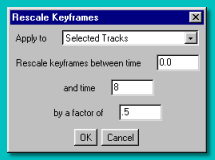
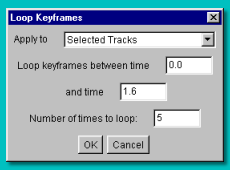
The settings shown on the left, for example, will make the character walk twice as fast.


Closing Remarks

Of course, this is just a starting point for creating all manner of interesting walks and runs. My character has a very purposeful walk which is probably slightly exaggerated. You could loosen the walk up by reducing leg and arm motions in the poses, for example. On the other hand, you could exaggerate the movements even more, you could add some lateral limb movements, you could change the type of bob to give a different 'weight'. The options are endless.