12. Scripting
There are a wealth of possibilities available via the scripting feature which utilises the Groovy and Beanshell scripting languages to allow you to program new objects, tools and many other features. The scripting feature also allows use of the Art of Illusion methods and members found in the AoI source code.
The scripting tools are located in the lower section of the Tools menu. A full description and tutorial on the scripting feature is available on the documentation page of the main Art of Illusion website.
There are 3 types of script:
12.1. Object Scripts
Object scripts create new types of objects (‘scripted objects’). In this case, the script is continually evaluated so that objects can have ‘intelligence’ in the way they react to, for example, position, orientation or time.
To add an Object Script, select Tools -> Create Scripted Object. This displays the dialogue shown on the right:
At this point, you can give it a name by typing into the Name box.
To create a new instance of an already written script, select the name of the script from the Script drop down menu (AoI will automatically list any .bsh or .groovy files that are in the /Scripts/Objects folder) and click OK.
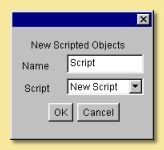
To write a new script, select New Script from the Script drop down menu and click OK. This brings up the script editing window as shown below:
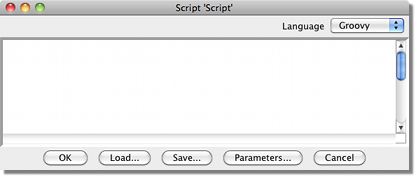
Enter the lines of the script directly into the main part of the window or Load an existing script into it. See the Scripting Tutorial for details of actual script programming.
Click on Save to save the script. Ensure that it is saved into the /Scripts/Objects folder so that AoI can find it.
Parameters is a way of adding variables to a script which can be controlled outside of the script via animation tracks. See the Scripting Tutorial for more details.
12.2. Tool Scripts
Tool scripts are used to carry out a single action as they are only evaluated when invoked. Such scripts, for instance, can create new objects within the scene or modify existing ones. Tool scripts can also carry out actions on many other elements of a scene such as textures, materials and animation tracks.
Existing Tool Scripts can be evoked by selecting Tools -> Scripts and then selecting the appropriate script from the drop down list. This list contains all the Tool Scripts in the /Scripts/Tools folder. Depending on the script, you may need to select at least one object before running the script.
To write a new Tool Script, select Tools -> Edit Tool Script. This displays the tool script editor, which is similar to the Object Script editor described above. The Run command runs the tool script. Run to Cursor and Run selected run only portions of the script. They are primarily used for debugging and experimentation.
12.3. Startup Scripts
Startup scripts are tool scripts that are executed every time the program starts. Such scripts need to be stored in the Scripts/Startup folder. These scripts can be used to configure AoI to maintain a certain layout each time it opens, to load a particular file at startup, or even to define and register a small plugin.
Startup scripts are created using the Tools -> Edit Tool Script command. This displays the script editor; scripts can be entered directly or loaded from disk. Use the Save command to save the scripts into the Startup folder. See the Scripting Tutorial on the AoI web site for details of actual script programming.
One use of Startup Scripts is to set the Look and Feel of the interface which is possible on version 1.8 or later of AoI. Look and Feels can be downloaded from the internet. Just search “Swing Look and Feel” in your favorite search engine. In most cases, you need to put the downloaded .jar file in your Java Runtime Environment (JRE)/lib/ext folder. You then need to write a one-line Startup script as in the example below:
UIManager.setLookAndFeel("com.birosoft.liquid.LiquidLookAndFeel");
The part in quotes is the full path to the actual LookAndFeel class which will vary according to the look and feel you are using. The documentation that comes with it should give the full path. Save the Startup script with any name - it will then be executed at startup and your required look and feel will be loaded.
12.4. Scripts and Plugins Manager
(Edited from text provided by Francois Guillet)
Note that this section of the manual contains only a section of the full documentation for this plugin - full documentation is available here. This includes information on the correct formatting of script comments etc. required by the Scripts and Plugins Manager.
The Scripts and Plugins Manager allows you to manage the scripts and plugins installed in the Art of Illusion folder. Using this tool, scripts and plugins can be installed, updated or removed on the fly, without even relaunching AoI (Objects and Tools scripts, not Startup scripts for obvious reasons !). Plugins modification, however, requires that AoI is relaunched to work properly.
To use the scripts and plugins manager, select Tools -> Scripts & Plugins Manager. The following window appears:
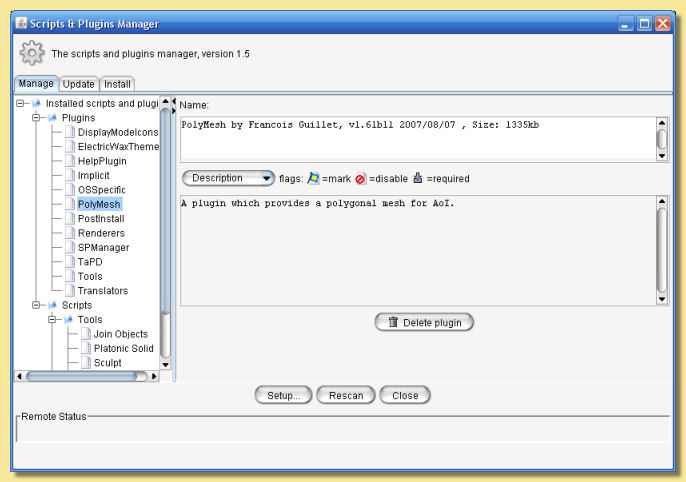
The tabbed pane on the left side shows three tabs. The first one (Manage) allows browsing of currently installed scripts and plugins. The second tab (Update) browses updates available at a remote repository for these installed items. The third tab (Install) allows browsing of scripts and plugins available at the same repository but that are not currently installed and are thus candidates for installation. The remote repository scan for scripts and plugins begins only when one of the two last tabs is selected.
The pane at the right side of the window shows some information about the currently selected object: name, author, version, etc… A dropdown menu also allows other information to be displayed, e.g. other files required and development history.
The Delete plugin/script button as shown on the picture allows the selected file to be deleted. Warning: do not delete vital AoI plugins (i.e. Renderers, OSSpecific, Tools and Translators). On some systems (Windows at least), it is not currently possible to delete a plugin because it is being used by AoI. In this case, the manager will asks you to remove it manually, i.e. delete the specified plugin file from the Plugins directory. Quit and relaunch AoI after deletion.
The buttons shown at the bottom of the pane depend on the tab currently selected. This second picture shows the dialogue as it is when the Install tab is selected. When the Update tab is selected, the display is identical apart from the fact that ‘Update’ replaces ‘Install’ on relevant buttons.
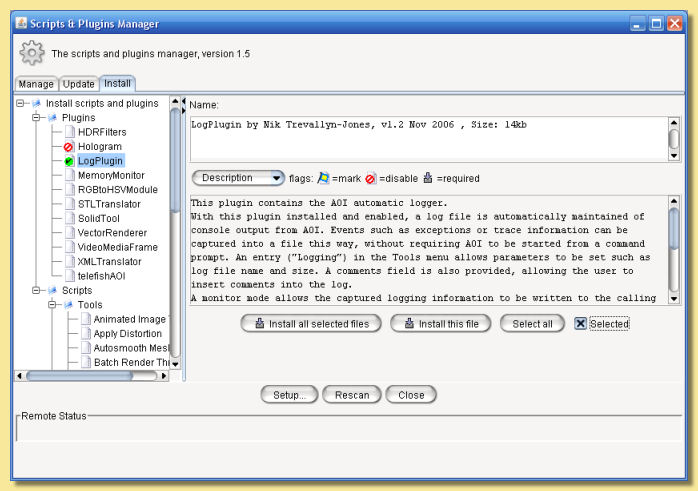
This time there are three buttons and a checkbox at the bottom of the pane. The Selected checkbox allows the selection of a particular script or plugin for update. The Select all button checks all the available items for update and is equivalent to manually checking all the available scripts and plugins. All the checked scripts or plugins show a checkmark over the relevant file icons. The Install this file button immediately installs the current item, whether it is selected or not. Finally, the Install all selected files button installs all selected files, i.e. the items that have a checked selected checkbox.
The Update tab works in exactly the same way as the Install tab.
If scripts have been installed or updated, they are directly available in AoI where they can be used. It is thus possible to install a plugin that sounds interesting, test it and remove it if it turns out that the script is not that interesting!
The Setup button allows selection of the repository used to get remote files, as well as specifying proxy information if you have to use a proxy.
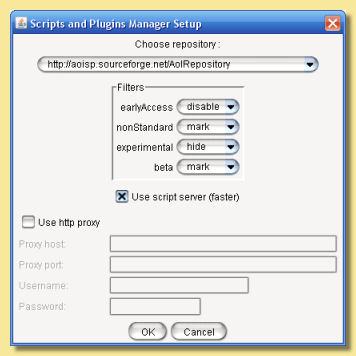
The Choose repository dropdown list allows the choice of the repository currently used. This allows the selection of a backup repository in case the main repository is not responding. The chosen repository is remembered the next time AoI is launched. The Repositories list is updated each time AoI is launched or each time the Rescan button is clicked. It is thus not necessary to manually update this list. If something goes wrong, though, you might have to delete the file named .spmanagerprefs and use the URLs hard coded in the plugin. This file is saved next to the AoI preferences file. You might also want to manually add a URL to this file (the format is straightforward). The current property must be set to the number of the URL you add to the file. Be warned, though, that any manual addition of a URL to this file is temporary since a fresh list of repositories will be downloaded at next connection.
Filters allow the seach to be tailored for particular types of script/plugin.
The Proxy section makes it possible to use a proxy if access through a firewall is required.
Security Warning: Passwords are saved encrypted. However, since the code for password decryption is available in the source code, it is always possible for the code to be broken. If you do not wish the password to be saved, you can enter a dummy password in the setup window before quitting the manager.
The Rescan button is for rescanning the current repository for updates and installs.
Finally, there is a status bar at the bottom of the window. This status bar shows which URL is contacted and what kind of information is downloaded. There are two occasions on which the Script and Plugins Manager contacts remote distant sites:
when downloading an up-to-date repositories list from Sourceforge in case the repositories list has changed.
when scanning a repository.